 New Bunks for the Batboat Trailer
Warm weather at last! Temps were in the 50 - 55 degree range so I got to work on properly adjusting the trailer to the Batboat.
The structural stuff was torn out of the boat last year making the flexible hull too unstable for laminating in the new stringers and deck. New trailer bunks and roller adjustments will make the hull perfectly "square" on the trailer for the rest of the rebuild. Without this, the wobbly fiberglass hull will be eskque after the repairs are done as well as making it difficult to work in it.

The hull was an uneven 1 1/2 inch off one bunk causing it to tip side to side the last time I drove it to the boat docks.

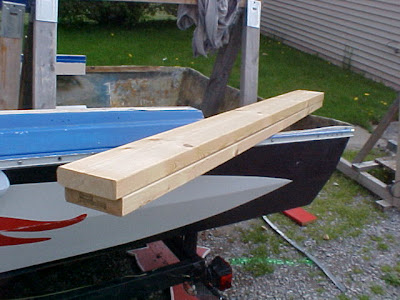
The new bunks are made from two 6 foot 2x6 boards. It gave me needed height to work with. The old ones, carpeted 2x4s, were tossed.
I reused all of the old nuts and bolts from those bunks. Although it took some time to get them to budge, there was not a need to buy new ones.
The hull shape changes along the bottom so angles were cut at the tops of the bunks to conform to the "Deep-V" design.

Drilling two new bolt holes in the transom side of the wood.

I positioned the bunks to extend out from the bottom of the transom end about an inch. The curved ends I made will be more gentle on the boat's bottom when loading and unloading the craft, I figured.
 Adjusting the Batboat up to make it level on the trailer and drill bolt holes in the bunk.
The bunk ends at the transom were bolted first. This let me perfectly size in, adjust and drill holes for bolts at the other end.

Next the two rollers were adjusted. Then at last the Batboat was perfectly fitted square on the trailer. All it takes is a little one handed push to make it slide off. Last year I had to use both of my legs to make it budge!!!
I spent the rest of the evening proudly sliding the boat up and down the trailer with ease.
The next day the bunks were taken out to paint weather sealer on them.


There was more sealer left in the can after the first two coats so I glopped on 2 to 3 more the next day. I have no other use for the stuff!!!
They sat in the warm sun (flipping them over every few hours) for several days and on the 14th I began the carpet work.

I picked a black exterior carpet with a ribbed pattern and nailed them down with shiny one inch electro-galvanized roofing nails with the bunks laying on the sidewalk.
The carpet has a mat weave and will not snag on anything easily, unlike the junkier stuff I've seen. Found it at Lowes for $.58 per foot. It comes as 12 foot width cut at any foot length needed. I trimmed these down from the foot lengths.


Holes were drilled though the fabric. When bolted to the frame, the combination of washers and carpet makes the bolt holes virtually waterproof.
The bunks are protected from bad weather anyway. They are under the boat 99% of the time and will last beyond my lifetime.

The Batboat is now perfectly seated square, the weight is fully supported and distributed on the trailer.
I probably took around 4 or 5 hours of work over three days to do all of this.

I got to play with the tilt trailer a little since there was no danger of the boat falling off. Finally, having lots of fun with the Batboat after the long cold winter! :)
 For all two or three of you tuning into this blog, it was at least 75 degrees in mid-Michigan today! (Yea!) In a week or two the new polyester fiberglass resin will arrive and work will begin on the Batboat again.


UgBKCN4P)2Gw~~_3.JPG)


