Tuesday, July 28, 2009

Hot Wheels Batboats found


This evening I arrived home from a nice long, relaxing trip to Genesee County in a search for Hot Wheels Bat toys and a visit to the mall. People at the 66Batfan.com forum said the 1:50th scale stuff was showing up on shelves again.

After making weekly road trips to various stores in the tri county area since February, I finally found my first two 1966 Batboats at the Toys R Us down the road a few weeks ago.

Today, to my surprise, the Toys R Us near the Genesee Valley Mall had four 1:50th scale Batboats on the same peg, a Batcycle and two Batmobiles. One 1:64th scale $.99 Batmoble was there too, hidden beneath other cars.

Can't believe that those $.99 Batmobiles are still popping up in stores this late in the game! Hot Wheels stopped shipping those a long time ago, they say.

In all, I came home with all four Batboats, one Batmobile and the $.99 Batmobile.


I took one out of its packaging for the first time today. This vehicle is fairly accurate to the original vessel in many ways and to hold a three dimensional version gives a different perspective on how it looked verses photographs.


I'm not the toy collector type but this has been the first time in decades that a manufacturer had been given licenses to make 1966 Batman vehicles. They are low priced and I am a sucker for '60s Bat-stuff.

These are shipped to stores boxed with later Bat vehicle incarnations but the '66 toys seem to sell the quickest and are hardest to find.


From my trips around eastern Michigan to date I've brought home ten $.99 Batmobiles, three 1:50th scale Batcycles, three Batmobiles with trailer hitches, and six Batboats. Most will be given away as presents and maybe displayed with the Batboat vessel.

There are a few updates coming soon on the full sized Batboat work. The deck is almost ready to go in. Stay tuned!

Wednesday, July 22, 2009

Batboat Rebuild: Day 34 July 19th, 2009

I didn't do much work today. Just ground off the excess fiberglass from the cross braces, glassed over sections of the two remaining stringers with what was left of the 1708 cloth and made the template for the deck.

There wasn't much to show regarding the fiberglassing so I didn't take pix.

BEFORE

AFTER
The cross braces cleaned up nicely.


Three days later, the several problem spots on the largest stringer were very visible. I'll have to grind out the large bubbles and patch them. No big deal.

The fiberglass going up the sides are not too much of a concern. It is the top edges that need fixing because the deck plywood has to lay on top the stingers flat and even.


When I was fiberglassing over the second small stringer I decided to let the resin kick in a little so I wouldn't have to stand over it, constantly rolling it back into shape with a fiberglass roller until it stiffened.

The cloth covering the top of the stringer began to get a little stiff. I went to roll it to find the ends touching the hull had almost bonded!!!!!! I tried to ripped it off but one side didn't budge so I grabbed the scissors, cut off what I could and rolled it flat to the hull. This is something I will never do again!

I am out of 1708 biaxial fiberglass cloth so I took the last of there was that had been cut for the second long stringer and used that to finish the job.

This gave me just one short section of 1708 biaxial left! Instead of glassing it all on at once it was cut into three, each piece overlapping by a couple inches. Rolling it on in sections with overlap turned out to be easier to work with than the one long cloth.

I finished up the stringer under the bow with four scraps of 1708. Two overlapping with two more on top.


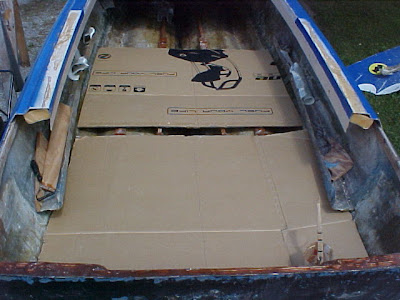
The fun part of rebuilding this anti-crime cruiser has begun! Hours later after the fiberglass resin had cured I made the templates for the new deck plywood sections.

Thanks to Art Noey Maytag of Saginaw for giving me the free cardboard! It is thick, corrugated and worked great!

The new deck sections will be three pieces of 1/2 inch exterior Douglas Fir plywood cut four foot long. Each butts up end to end. The cardboard was shy four inches but was perfect for what I needed. The following pix show the templates spaced 4 inches apart.


Making these was easy. The deck piece starting at the transom was a uniform 52 inches in width, so was the middle but tapered off to 49 1/2 inches nearer to the bow. The last piece is odd shaped and narrows at varying points. It didn't take too long to get this done.


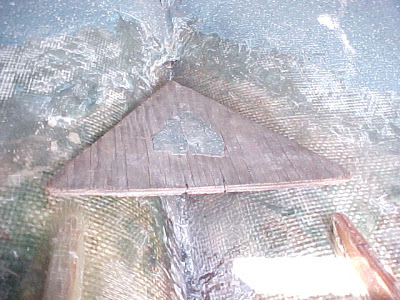
The triangle plywood you see in the photos is original to the boat and had been fiberglassed in as part of the deck at the tip of the bow. Just as the original deck, it is untreated 3/8 inch ply and will be replaced with 1/2 inch exterior grade Douglas Fir.


This triangle piece was stapled to the front end of the deck ply and was fiberglassed in along the edges. The exposed center was painted over along with everything else under the bow area.

When demolition started on the Batboat I found the ply was moving around loose under the fiberglass!

It was dusk so all the tools were put away, all around the boat was cleaned up, tarp put back on, and I called it a day.

Batboat Rebuild: Day 33 July 16th, 2009

Now that the construction adhesive had bonded all the stringers in the hull my goals for today were to lay fiberglass on the two cross braces and two of the stringers.

I have to take a day off between work on the Batboat because all of the bending and putting myself in odd positions in the hull leaves me stiff and sore, especially in the lower back. Wearing my weight lifting belt helps out a lot. Its worn from this day on.

Again, screws at the ends are supporting the brace plys on the saw horses. Here they are wet down with polyester resin. I laid the 1.5 oz chopped strand mat on top and rolled them on using a fiberglass roller.

The finished product. At the end of the day both sides were protected and water proofed with fiberglass. I'll grind all the excess off another day after the resin is completely set.

Lengths of 1708 biaxial fiberglass cloth were cut for fiberglassing over two of the stringers. I was doing one side of the hull one day at a time so cloth was cut for the other two for another day but I didn't have enough left. Five more yards of1708 was ordered that morning so no big deal.

This stuff is many times more stronger than what was originally used by the factory. More on this later. The width of it laying on the hull makes the boat stronger, also.

To fiberglass the cloth over the stringers a lot of polyester resin is spread over the ply and the hull where the cloth goes. It is then shaped around the stringers and rolled with a fiberglass roller.

That thick 1708 cloth soaks in a great deal of resin! More resin was pained on top and rolled until it became transparent.


1708 biaxial fiberglass cloth does not bend around edges very well but in this case the small stringer turned out good.


The five gallon bucket of resin was almost empty but it wouldn't pour out of the dang thing. A few holes were knocked in the bottom with a crowbar and the rest dripped out into another container. I ended up with 16 oz. more resin to use which otherwise would have gone to waste. This stuff is expensive costing up to $50 per gallon depending on shipping charges.


I hate getting resin in a five gallon bucket!

After mixing it with the MEKP activator, I wet down the long stringer, mixed more up and began glassing the cloth in.

A big mistake was made here that I hope will help you out if you are making your own Batboat. I started glassing in the long stringer beginning from the transom and worked my way into the bow. This got me into some sticky situations with my Tyvek suit. On the way in and out I accidentally stood, sat, and kneeled into the work I had done. It is best to start at the bow and work your way back.

The seat and feet of my suit frequently got stuck to the hull. Days later I had to use my grinder to get the shreds of material out!

Here is the suit. The seat and crotch is split out and feet gone.

Some of the 1708 cloth lengths were slightly misshaped at the ends before I glassed them in. At first I thought they would lay flat when soaked with resin but so such luck. Those spots will have to be ground out and patched with more 1708.


Be careful not to get odd pulls in the weave of your woven biaxial fiberglass cloth. This is what it looked like a day or two later.

This bubble surely has to be ground out and fixed with a patch of 1708.

With exception for some odd scraps, I was out of 1708 biaxal and got this far up the stringer. Halfway up the end section under the bow.

At this point my Tyvek suit was torn to shreds, parts were stuck to the hull, I ran out of 1708, and the low class, stoner neighbor's dog had been barking for three or four consecutive hours. With no more areas to glass in I threw the container with 12 oz. resin left in it across the yard.

Frustrated, I was done for the day!

Tuesday, July 14, 2009

Winding down

In a few days, weather permitting, the deck will be installed in the Batboat. Most of the heavy structural and grinder work will be finished.

In the duration of the last six weeks my car had been in the path of light clouds of fine fiberglass particles and saw dust. The morning dew and humidity made a sticky mess of it and those messy afternoons are coming to a close.

What a nice night to wash the car! Cool, breezy and slight overcast evening at the coin op car wash near my house. Its been the first time in a long while since its been washed.

Tomorrow it rains but I don't mind. :)

Fiberglassing tip.

Unfortunately, when in between fiberglassing projects sometimes left over polyester resin will begin to harden before I can use it on the next. I can't keep it in the bucket because I'll need it to mix up the next batch. What to do?

I found I can dump the left over resin in a damp spot of the gravel driveway. The combination of the thickened resin and water in the soil prevents it from seeping into the ground. Several days later I pick up the hardened blob off the ground and put it in the trash.

Batboat Rebuild: Day 32 July 13th, 2009

Two days later the adhesive had bonded the one stringer to the hull nicely. Today I spaced apart and linked the rest together to caulk in two others.

I ground off the excess fiberglass from the fourth stringer brace that I repaired.
The two longest stringers were temporarily fastened with cross braces and stainless screws to keep them all square.


PL premium adhesive caulk spread nicely under and along the sides of the plywood.

I weighed down the two stringers on each side of the one already bonded in to simulate a level deck. Over the winter they developed a slight bend. Forcing them to their original shape made the adhesive bond them in level and at a uniform height. This will make putting the deck in a little easier.

The original boat, a '69 Glastron V-145, was not built with precision. Before doing all the caulking work, I laid the stingers in the boat perfectly measured and spaced. However, I moved one stringer into the position of the original and it made the deck level 2 to 2 1/2 inches higher on the drivers side.

The original deck line is still visible along the hull and it was higher on the steering wheel side and uneven in other spots.

If you are making your own Batboat keep in mind that the work you are doing is better than what was done in the factory. Don't split hairs if you make a small mistake!


Again, the cross braces, scrap ply and cans kept the stringers perfectly square, spaced apart and level as the caulk hardens. Yea, its overkill but took only a moment to do. ;)

You'll need this little gadget to save your caulk cartridge for the next day. I picked this up at Harbor Freight for $.99.


The next day I unscrewed all the cross braces and caulked in the last stringer (on the right). Again, plywood scraps, a cross brace and weights forced the ply level with the others bonded the day before.

Its suppose to rain tomorrow so I'll get the 1708 fiberglass cloth ready for fiberglassing the stringers into the hull.