Friday, September 26, 2008

Cool Picture Of The Week - Never Before Published Photo of the Batboat and Batgirl

Here are unpublished old Polaroids of Batgirl and the 1966 Batboat that the Glastron boat company sent for display at The Atlanta Boat Show.

These were posted at the Classic Glastron Owners Association forum recently by Joe Poole, Jr., a long time boat dealer. He estimates these were taken around 1967 - 1969. Batgirl was not introduced on TV until the fall of 1967.

It is unknown to me if Glastron made duplicates of the Batboat for exhibition or just had the one. If anyone knows, please let me know.

It appeared in the 1966 movie and footage shot during filming was used in only two episodes of the TV show making it one of the least used Batvehicles in the series.

Because of these brief glimpses it had been difficult to determine the original hull color. In most photos it looks black, due probably to shadowing, but at several wide shots in the movie it looks blue. However, after studying the picture Mr. Poole replied to me that the hull is blue and deck is metal-flake blue.

The original 1966 Batboat was damaged in a fire, I understand, and rebuilt as a car [with wheels, no less!] for parades. A shadow of its original form.

It is rare photos like this that give us a better understanding of what some of the original 1966 Batboat's features looked like.

Thank you Mr. Joe Poole!

Thursday, September 25, 2008

Batboat Rebuild: Day 9 September 17, 2008


The weather had been great so far so the next afternoon I hauled the large 8 x 10 foot sheet of marine grade plywood and table saw out of the back room to the back yard. The main objective was to cut the two longest stringers.

Stringers are very important structural components to a boat like mine. They are fiberglassed along the length of the bottom of the hull to help the fiberglass boat hold its shape. Mine has four of them. Two are about 12 foot long and two about 5 foot.

I made patterns from the original stringers a few days before, using the same kind of brown packaging paper I used on the transom. Rolls of this were found during a chance visit to the dollar store and they came in handy. The longest stringers are 12 foot.and the paper is, I think around 15 feet.

I traced the rotten wood on the sidewalk in front of my house, cut out the pattern, traced that to the plywood, and cut with a jig saw.


The two longer stringers was so rotted in their fiberglass wraps that I had no trouble pulling them out of the Batboat by hand and they came out mostly intact. The other two smaller stringers had to be cut out of their fiberglass with my grinder the day after this.


The above shows the original stringer lying on top of the new one. They are almost a perfect match.

My new jig saw. I got it at Lowe's clearance priced and like it better than some of the higher priced models they had.


The stringers are cut from a 3/4 inch, 4 x 8 foot sheet of Marine Grade Douglas Fur plywood, one of the best and expensive plywoods available.


At the end of the day I didn't have time to cut the traced out shorter portions for the long set of stringers so I set out to do that later.


The make and model ID tag for my boat was riveted into the splash well. I carefully drilled the rivets out and hope somehow to remove the blue paint without damaging the metal.

This is very thin and malleable.

The extremely fragile plate's model and serial numbers identifies my boat as being a 1969 Glastron V-145, color blue. More on that later.

Batboat Rebuild: Day 8 September 16, 2008


Consistant warm, beautiful weather at last!

Six days after coming back from Flint with the sheets of marine and outdoor grade fir plywood I started on the Batboat in ernest.

This is mid-September and I am in a race against the approaching cold Michigan weather. I need to get as much done as possible, before it gets too frigid for fiberglass resin to solidify.

First order of business was to properly cut the 3/4" marine ply I trace the transom patterns on.

With the new jigsaw, the top and the sides of the pattern were cut from the plywood at a zero degree angle. However, since the transom wall of the hull slants back 15 degrees I made the bottom cuts accordingly so it sits perfectly flat at the bottom of the hull.


Above you see that the one of the two 3/4 inch plys fits perfectly. But when the rear splash well is fitted on the boat the second sheet gets in the way. To fix this I left one plywood sitting in the boat as I traced the splash well around it and cut that part out.


It fits perfectly, now.


I cut the new transom pieces while sitting on it from my concrete porch. I've had metal saw horse assembly things in my back room for months and if I was to continue making the other structural parts they will be needed.

Putting those things took much longer than I expected. A majority of that day's work was making the saw horses.

This day's work was about two or three hours including breaks to think things out and clean up.

Batboat Rebuild: Day 7 September 6, 2008


Yep.

I didn't do one damn thing with the Batboat in August. The reason being no money.

On Sept 6th increased business (and cash flow) inspired me to prepare the plywood I've had forever in my back room for being cut for the transom.

I cut out the paper pattern I made back in July of the boat's transom and traced it to the plys.

A couple days later I bought a circular saw and tried to cut it hoping I didn't have to get a jigsaw to make it around the corners. I was wrong and bought a jig saw.

Monday, September 15, 2008

Should I laugh or cry at this?

Fiberglass 500 - Asphalt Boat Races.

Sunday, September 14, 2008

Boat accidents


This guy didn't have his boat tied to the trailer, apparently.

Here's a speedboat photo. Taken in Stephensville, Maryland.

[edit: People are telling me that this photo was faked.]

Thursday, September 11, 2008

Batboat Rebuild: Day 6 July 30, 2008

On July 30th I finished up removing the deck with that was left under the bow. This is a small crawl space and I had a hell of a time getting it out.

It was painstakingly removed while I laid on my side in full suit, respirator and safety glasses while holding the grinder over my head pressing the wheel down on the fiberglass.

Glass dust was everywhere in the air and I had to stop many times to wait for it to settle down. Couldn't see with the safety glasses on because they got covered with dust quickly and I took them of.

The work took about three or four hours.


Geesh! It was hotter than hell out that day and the boat was so light it rocked back and forth with every move I made. With all of the structural wood removed the hull is unstable. When I moved too far from the center the boat would tip off the trailer.

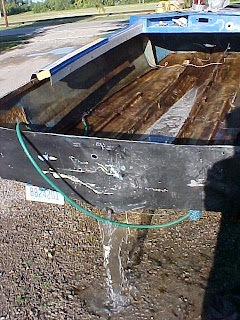
After shopvac-ing glass dust for a while I decided to just wash the hull out with a garden hose. This made quick work of it all.

I haven't done much work on the boat since then but have all the fiberglass cloth, tools and ply on hand.


Batboat Rebuild: Day 5 July 27, 2008

I found some more time to work on the boat Sunday, July 27th.

I bought my first grinder a few days before and found I could have removed the deck faster and easier with that than with the sawzall.

The new grinder was quickly out of the box and because I never used one before I tested a few spots on the transom and the remaining rear deck. I didn't see any dust but could smell the fiberglass and didn't think there was any harm to myself and continued to grind fiberglass and decking for another five minutes with no protection. A big mistake.

The next day I woke up feeling like I had a respiratory infection and this lasted for four or five days. After the first couple of days I tried to walk a block away to the corner store and could hardly make it.

I know now that when grinding fiberglass always wear a full respirator. You'll need the ones with with filters, not the surgical type. The surgical type just won't work. If you smell fiberglass dust, you are also breathing it in.

Fiberglass dust is also like itching powder. Not only was I sick but I itched like crazy for the next couple of days.

For July 27th, I bought a full respirator and wore one of the full body Tyvek suits I bought online from Uline.com. I was ready from head to toe to grind out the rest of the transom and rear decking.

Here I am in full suit. Under all of this was Dickie overalls. Tyvek suits do not breath. I was over 90 degrees outside and by the end of the day I was soaked with sweat but had fun.

For several hours I ground out the rest of the rear deck, bilge and old rotted transom and prepared the area for the new transom.


There was a lot of fiberglass dust and it took a while to get it all out with my shopvac.


The original transom looked sort of like this.
The new transom I'm installing will completely cover the rear of the hull so I made a template out of a roll of package wrap paper I found at the dollar store.


The new transom will also be much thicker and will give the boat much more strength than when it left the factory in 1969.

This is the old bilge drain. I'll need one about twice the length for the new transom.

Batboat Rebuild: Day 4 July 21, 2008


On July 21st I cleaned out the loose stuff in the hull and took out more of the rear deck.

The bagged up foam and deck fragments had been sitting near my house for almost a week and tomorrow morning was trash day. There must have been nine or ten bags full and some were rebagged due to weight and edges of deck poking through.

Batboat Rebuild: Day 3 July 15, 2008

I am going to start posting updates on my progress. This is for day 3, July 15th.

I finally had found time to work on the boat again and started on removing the deck with my reciprocating sawzall.


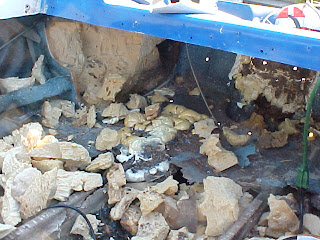
Here are chunks of foam flotation I pulled up from between the stringers. Most of it was perfectly bone dry and still good but nearer to the stern it was all soaked. I decided to throw it all out.


I had a hard time getting to the deck that was under the spashwell so I cut it out. When most people work on fiberglass boats they separate the top half from the hull. However, if the top is off too long the hull looses its shape under its own weight. The alternative is removing the splash well and fiberglassing it back in later.


Now I can remove the rear deck and bilge area easier. The spots on the left and right sides of the boat are filled with more flotation foam. The expanding type. This is to keep the boat afloat in case there is an accident on the water, however, the majority of the this at the rear of the boat was saturated with decades worth of water.


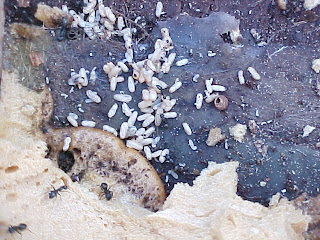
When I started on the rear deck and the left and right flotation compartments I found a large black ant colony. They scattered in every direction carrying white sacks everywhere they went, which I guess were ant eggs. It looked like something out of the National Geographic channel!!!

There must have been hundreds of them living in there. A large spider on a web as well!


Here is what is left of the transom. This is where the engine sits and has to be replaced.


I dug out most of the foam and threw it on a tarp for trash bagging. The soaked ones must have added a couple hundred pounds to the boat.

The foam between the stringers were scrap-like and were just laid in. However, the flotation compartments were filled with expanding foam and it took a while to get it out with a wrecking bar.

Also, one of the previous owners added his own foam which was the toughest to remove.


Here is one of the remains of a flotation compartment. It makes me think of how nice this vessel looked when new. All of the wood fiberglass under the splash well was painted Glacier Blue with black and white speckles. I thought it looked 1969 cool.