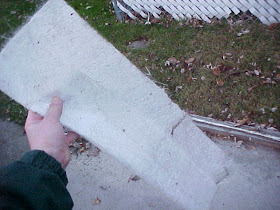
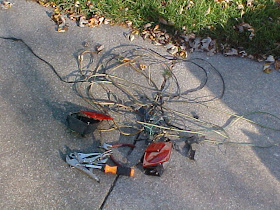
Two weeks ago I won a set of two rub rail end-caps on eBay (pictured above, to the left and center). Only one was found remaining on the Batboat when I got it and it was broke. (pictured above to the right)
Except for that one cleat resting in Davy Jone's locker somewhere at the Zilwaukee boat launch, these decades old stock parts are the only fixtures missing from the 1969 Glastron V-145 Batboat.
Sadly, despite being used on a variety of different boats 35 to 40+ years ago, they are still rare and hard to find.
Over the summer someone at the forums offered me a pair for $25 each. However, I fortunately won these on eBay for $5 plus $4.95 shipping.
The aluminum caps are made to cover the ends of the rub rail at each side of the stern and have a lip to cover the ends of yet another stylish metal piece mounted along the top of the transom.
I thought it was going to be tough to find replacements reasonably priced. The seller almost gave them away to me, considering.
I lucked out!
A journal of the history of the '60s Batman Batboat, how I came to buy a replica and my hopeful adventures in repairing and making it a functional Anti-Crime cruiser.
Wednesday, December 30, 2009
Batboat Rebuild: trailer improvements.
In late November through early December I worked on the trailer coupler. Most of the time was waiting for layers of paint to cure, finding spare time and good weather.
While mounting it, I found out what NOT to do if one decides to paint a trailer coupler.
I hope you learn not to make the same mistake I did.
First, however, the package with the new safety chain set from iboats.com had arrived; Seasense brand Stainless Steel Trailer Safety Chain, Class 1, 2000lbs.
I am extremely surprised, happy and impressed with the set. Heavy, shiny and high quality. Most importantly, they are made of stainless steel that will never rust and the safety links won't come undone while on the road. Well worth the $28.
A "Trailer Jack Wheel Stop" was added to the order. With the Batboat on a paved driveway now there is a problem with the trailer moving when I'm in it, sometimes causing the jack to collapse, slamming the front end into the concrete. Problem solved for $2.90.
After a week of shopping around I had a new coupler.
For some reason, all of the big box retailers in this area carry the Reese couplers but oddly only WalMart had them with extras and $10 lower in price.
WalMart had the 1 7/8 ball couplers with a tethered pin and spacers to accommodate my 2 inch channel; things to keep an eye out for. Other places carried Reese and other brands but with no extras. Lowes, Meijer, Gander Mountain, Handy Andy, Menards, and more. I don't get it.
Also, while the competitors priced Reese couplers at $20+, WalMart stocked them at $11.86.
I wacked the tounge into shape to clamp the coupler on it square to enable the drilling of the bolt holes.
Clamp held it and the spacers into place.
Important information about installing a coupler!
The two holes on the top are NOT for mounting but are there for manufacturing. They anchor the raw steel plate in the forming press to make everything symmetrical.
An iboats forum member explains "Without an anchoring system the dies could pull the plate off location giving a ill formed product. Like too much material on one side of the ball socket, not enough on the other for example."
Use all four side holes.
I had already paid $2 for its stainless steel fittings so one rear top hole was also used.
Before mounting it, I painted the coupler.
To property paint this I did the following. The oily factory coating was removed by scrubbing with Acetone and a rag. The metal surface was scuffed up with coarse grit sand paper and cleaned with Acetone. The next day, White Krylon primer spray paint was built up in many thin coats followed by thin layers of Sunshine Yellow Krylon and left to cure for several days.
Why yellow, you may wonder? It was left over from making my trusty Batman utility belt! lol
The coupler turned out nice.
When time and weather permitted, it was mounted to the trailer.
One thing I never considered was the fragility of Krylon paint, sadly. A little chipped under the pressure from the washers as I tightened the bolts on top and also on several spots while handling it.
The dings aren't visible unless one looks closely for them but I regret doing the spray paint job. I strongly recommend that if you want to color the coupler, dismantle the locking mechanism first and take the main body into a professional shop to get powder coated!!! Put the locking part back in and leave it bare. The act of locking it down digs into paint if painted.
I hope you learned not to make the same mistake I did.
However, considering that the Batboat is the main priority and the trailer is at the bottom I am not that worried about it too much. Perhaps I will take it off, remove the paint and have it powder coated in the future.
$6.75 worth of various stainless steel 3/8 inch bolts, washers, lock nuts, nuts, and more prove this coupler is never falling off! :)
The chain looks great on it and is the right length for my hitch set-up.
At last a coupler mounted square on the tounge. I will finally be able to back the Batboat into the water without it veering off in strange directions. lol!
While mounting it, I found out what NOT to do if one decides to paint a trailer coupler.
I hope you learn not to make the same mistake I did.
First, however, the package with the new safety chain set from iboats.com had arrived; Seasense brand Stainless Steel Trailer Safety Chain, Class 1, 2000lbs.
I am extremely surprised, happy and impressed with the set. Heavy, shiny and high quality. Most importantly, they are made of stainless steel that will never rust and the safety links won't come undone while on the road. Well worth the $28.
A "Trailer Jack Wheel Stop" was added to the order. With the Batboat on a paved driveway now there is a problem with the trailer moving when I'm in it, sometimes causing the jack to collapse, slamming the front end into the concrete. Problem solved for $2.90.
After a week of shopping around I had a new coupler.
For some reason, all of the big box retailers in this area carry the Reese couplers but oddly only WalMart had them with extras and $10 lower in price.
WalMart had the 1 7/8 ball couplers with a tethered pin and spacers to accommodate my 2 inch channel; things to keep an eye out for. Other places carried Reese and other brands but with no extras. Lowes, Meijer, Gander Mountain, Handy Andy, Menards, and more. I don't get it.
Also, while the competitors priced Reese couplers at $20+, WalMart stocked them at $11.86.
I wacked the tounge into shape to clamp the coupler on it square to enable the drilling of the bolt holes.
Clamp held it and the spacers into place.
Important information about installing a coupler!
The two holes on the top are NOT for mounting but are there for manufacturing. They anchor the raw steel plate in the forming press to make everything symmetrical.
An iboats forum member explains "Without an anchoring system the dies could pull the plate off location giving a ill formed product. Like too much material on one side of the ball socket, not enough on the other for example."
Use all four side holes.
I had already paid $2 for its stainless steel fittings so one rear top hole was also used.
Before mounting it, I painted the coupler.
To property paint this I did the following. The oily factory coating was removed by scrubbing with Acetone and a rag. The metal surface was scuffed up with coarse grit sand paper and cleaned with Acetone. The next day, White Krylon primer spray paint was built up in many thin coats followed by thin layers of Sunshine Yellow Krylon and left to cure for several days.
Why yellow, you may wonder? It was left over from making my trusty Batman utility belt! lol
The coupler turned out nice.
When time and weather permitted, it was mounted to the trailer.
One thing I never considered was the fragility of Krylon paint, sadly. A little chipped under the pressure from the washers as I tightened the bolts on top and also on several spots while handling it.
The dings aren't visible unless one looks closely for them but I regret doing the spray paint job. I strongly recommend that if you want to color the coupler, dismantle the locking mechanism first and take the main body into a professional shop to get powder coated!!! Put the locking part back in and leave it bare. The act of locking it down digs into paint if painted.
I hope you learned not to make the same mistake I did.
However, considering that the Batboat is the main priority and the trailer is at the bottom I am not that worried about it too much. Perhaps I will take it off, remove the paint and have it powder coated in the future.
$6.75 worth of various stainless steel 3/8 inch bolts, washers, lock nuts, nuts, and more prove this coupler is never falling off! :)
The chain looks great on it and is the right length for my hitch set-up.
At last a coupler mounted square on the tounge. I will finally be able to back the Batboat into the water without it veering off in strange directions. lol!
Sunday, December 6, 2009
New York Times article, slideshow and video on finned boats.
The New York Times' website devoted a space in the cars section to finned boats.
Here is the article. On the right side of the page, half way down is a short video.
http://www.nytimes.com/2009/08/16/automobiles/collectibles/16finboat.html
The slide show.
http://www.nytimes.com/slideshow/2009/08/16/automobiles/collectibles/0816-finboats_index.html?ref=automobiles
I see some Manta Rays, Meteors, Glass Slippers, and a few more rare gems in there. Less than 10 of some models are known to have survived.
Thursday, December 3, 2009
Tuesday, November 24, 2009
Trailer repairs and Batboat rebuild is on coming.
Several have emailed wondering if the Batboat rebuild is still oncoming so here is a small update.
UPS delivered the stainless steel safety chains a while back, I bought the new trailer coupler over the weekend and got one of the three through-bolts today in hope to have the coupler bolted on the trailer by early December.
Depending on the weather and finding free time, the cleaning and painting of the new coupler will take a few days to finish.
After the trailer is fixed, the current plan is to go to Michigan Lumber in Flint for the plywood to make the fins and laser eyes. They sell the finer quality Douglas Fir plywood there and it is stored on flat shelves, not on forks like the warped plywood is at all big box retailers here.
First, mock-ups and patterns of the new Batboat details will be made of some type of low cost fiberboard. It all depends on how much funds I have and the weather.
These large 4' by 8' sheets of board will be hauled home in the Batboat; the most important reason to fix the trailer first. Stay tuned.
Thursday, November 12, 2009
Batboat Rebuild: trailer and fiberglass cloth, November 11, 2009
Those following this blog know there are problems with the Batboat's trailer. I now suspect that at one point it was in a fender bender evidenced by the bent coupler and several small twists and dents in the frame.
Its getting too cold to do fiberglassing and woodwork outside so I will put the focus on making the trailer safe. It WILL be boring to most of you but I hope that those who are working on their own Batboat will find time saving information here.
On this day I took off the coupler and safety chains. The work lasted less than an hour.
The old chains were zinc plated and mostly rusted plus I never trusted their hook connectors. A new set enroute from iboats.com are made of stainless steel and have better connectors.
Above is the coupler. It connects to the car's trailer hitch. The yellow lines represent the correct level position of the trailer. As you can see this thing is bent out of wack!
It was welded to the tongue (the forward beam tip of the trailer) in three spots and I freed it off with the grinder and a hand vice clamp.
Two spots were cut through...
... and the coupler was bent and twisted off.
The rest of the attached coupler and welding was smoothed out with a grinder flapper disc. I wacked the beam back into shape with a hammer and coated the bare metal with spray primer to help prevent rust.
I'll get a new coupler after the chains get here.
Sundown was arriving meaning it was time to cut the lawn before it became too dark. When I opened the shed there was a nice surprise waiting for me. The rolls of remaining 1.5 Chopped Strand Mat and 6 oz Hexel fiberglass cloth fell from where they were shelved, unrolled on the floor and absorbed at least a month's worth of rain water, mud and all were well spotted with mildew! Totally ruined!
I kept these rolls and all of the scraps for nothing. About 2 yards combined of uncut cloth and a bunch of odd pieces were worthless. Oh well, at least the really expensive stuff, the 1708 biaxial, seemed okay. I'll check for mildew tomorrow! (checked it and it's fine but moved to the dry basement now.)
Can't use this for fiberglassing because the dirt and mold will promote rot! >:(
Its getting too cold to do fiberglassing and woodwork outside so I will put the focus on making the trailer safe. It WILL be boring to most of you but I hope that those who are working on their own Batboat will find time saving information here.
On this day I took off the coupler and safety chains. The work lasted less than an hour.
The old chains were zinc plated and mostly rusted plus I never trusted their hook connectors. A new set enroute from iboats.com are made of stainless steel and have better connectors.
click this link to view --> SeaSense Stainless Steel Trailer Safety Chains for 2000 lb loads.
Above is the coupler. It connects to the car's trailer hitch. The yellow lines represent the correct level position of the trailer. As you can see this thing is bent out of wack!
It was welded to the tongue (the forward beam tip of the trailer) in three spots and I freed it off with the grinder and a hand vice clamp.
Two spots were cut through...
... and the coupler was bent and twisted off.
The rest of the attached coupler and welding was smoothed out with a grinder flapper disc. I wacked the beam back into shape with a hammer and coated the bare metal with spray primer to help prevent rust.
I'll get a new coupler after the chains get here.
Sundown was arriving meaning it was time to cut the lawn before it became too dark. When I opened the shed there was a nice surprise waiting for me. The rolls of remaining 1.5 Chopped Strand Mat and 6 oz Hexel fiberglass cloth fell from where they were shelved, unrolled on the floor and absorbed at least a month's worth of rain water, mud and all were well spotted with mildew! Totally ruined!
I kept these rolls and all of the scraps for nothing. About 2 yards combined of uncut cloth and a bunch of odd pieces were worthless. Oh well, at least the really expensive stuff, the 1708 biaxial, seemed okay. I'll check for mildew tomorrow! (checked it and it's fine but moved to the dry basement now.)
Can't use this for fiberglassing because the dirt and mold will promote rot! >:(
Wednesday, November 11, 2009
Batboat Rebuild: Day 50 November 8, 2009
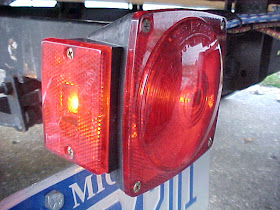
On this day I started refurbishing the Batboat's trailer turn signals. The wiring was a twisted mess and the lights stopped working while I was using the Batboat to move my things from the old house. Had to leave it parked until I found time to fix them.
Later, somehow the plug got squashed while the boat was in the drive way!
The trailer lights had two sets of cables spliced together at the end with crimps and electrical tape, each with their own plug. It all had to go.
As you can see over time this became a tangled mess hanging under the trailer with too much length.
Ripped it all out but I kept the lights, which were perfectly reusable.
A new set of lights was something over $35. To save a few bucks I rebuilt them. The lights would be rewired with this new harness I found at WalMart for $12+.
There was trouble running the wires through the trailer's main beam. Wouldn't go in more than a few feet before getting stuck. Looking round the yard I found a simple solution. Take a garden hose and run it through the beam out to the other side, stick the wires into the hose a few inches, wrap them together with tape, and pull the house back out; A quick way to thread wires through a hollow beam.
It was getting dark and I continued two days later by taking apart and rewiring the signals.
I got the lights into the house and worked on them with the soldering iron for a few minutes, put them back on the trailer, connected the harness ends, put in new bulbs, and they worked perfectly.
I never did anything like this before and probably spent two hours over the two evenings reverse engineering and working on it. They are now as good as new and I had lots of fun.
Wednesday, November 4, 2009
Batboat Rebuild: Seat Mystery Solved Part 2
The 1966 Glastron fiberglass boat catalog that I mentioned here three weeks ago came in the mail a while back. (I paid $13.89 for mine and another recently sold for $26, he he he.)
The pointed seat design shown in a '66 Jetflite V-143 Super Sport appears, from the back, to be a closer match for the ones used in the original Batboat than the '67 Jetflite V-143 mentioned in another blog post.
It looks like when it comes to having my own seats made I'll need to get hold of one of those and interpolate the dimensions of the Batboat's to base a new pattern on.
The Jetflites are the only boats built by Glastron with those pointed, turned up seating and are unique to that model.
Catalogs show Jetflite hulls had the seat bases molded into the deck from 1965 to 1970. From '66 to 69 pointed seats were used but not in 1970. The model was discontinued 1971.
The Batboat's seats were specially made and upholstered in glitter blue vinyl, as shown above. This is one of the scant close up glimpses of the original seat. It doesn't get much better than this, sadly.
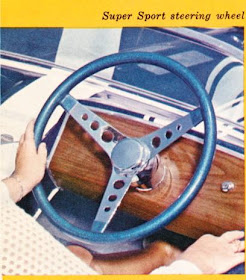
The '66 catalog also shows the same type of metallic blue steering wheel used in the original Batboat.